Avaya SBCE Integration Guide
- 14 Nov 2023
- 19 Minutes to read
- Print
- DarkLight
- PDF
Avaya SBCE Integration Guide
- Updated on 14 Nov 2023
- 19 Minutes to read
- Print
- DarkLight
- PDF
Article Summary
Share feedback
Thanks for sharing your feedback!
Avaya Session Border Controller Enterprise (SBCE) is a popular SBC product used in more than just Avaya environments. In our experience, we often see SBC's used to enable SIP and RTP traffic between a SIP Proxy and the Mindful Callback application.
This guide is intended as a supplement to the ACD integration guides for Mindful Callback and only addresses configuration for Avaya SBCE. A complete guide to integrating your ACD environment with Mindful may be available, as well.
The integration between Mindful and SBCE can be configured for standard SIP/RTP or the more secure TLS/SRTP option. Items that will need to be configured for either option are shown in the table below. The remainder of this guide will cover each of these items in detail.
| Basic requirements (standard SIP/RTP and TLS/SRTP) | Additional requirements for TLS/SRTP |
|---|---|
Required for both options:
|
|
Basic requirements
This section covers the basic required configuration for either option--standard SIP/RTP or secure TLS/SRTP. If you only plan to use standard SIP/RTP, then these are the only requirements for your integration. To use the secure option, you will need to configure these items first, then move on to the Additional requirements section below.
Create an Interworking Profile
The Interworking profile defines the interworking rules and features applied to a trunk server. This determines how the trunk will respond to specific SIP messages. You will need a new Interworking Profile for the Mindful Callback trunk in SBCE. Follow the steps in this section to configure the profile.
Quick access: SBC > Configuration Profiles > Server Interworking
- On the Server Interworking page, click Add above the existing list of profiles.
- Enter a name for the profile (such as Mindful).

- Click Next to open the General configuration window for the new profile.
- Configure the General tab as shown below:
Interworking Profile options

- Continue to click Next until you reach the Advanced Interworking Profile Configuration page.
- Configure the Advanced Interworking Profile Configuration as shown below.

- Click Finish to save the new Interworking profile.
This profile will be referenced later when configuring the SIP Server (trunk).
Create a SIP Server Profile
A SIP Server Profile defines the SIP connection to another SIP device (often referred to as a trunk). In an integration with Mindful Callback, A SIP Server Profile must be configured to establish a SIP trunk between the ACD's SIP proxy and the Mindful environment. This section will detail the configuration required to build the profile in SBCE.
Quick access: SBC > Services > SIP Servers
- Click Add above the list of existing SIP Servers, then give the new SIP Server a name (such as Mindful Callback).

- Click Next and configure the General page as shown in the screenshot below:

- Click Next, then skip the Authentication page and move to the Heartbeat configuration page.
- Configure the Heartbeat settings as shown below:

- Click Next, then skip the Registration and Ping pages to move to the Advanced page.
- Configure the Advanced page as shown below. For the Interworking Profile dropdown menu, select the Interworking Profile that you created in a previous step.

Create URI Groups
URI Groups in SBCE are filters used in Routing Profiles to determine where to send a call once it arrives into the SBC. URI Groups are configured with numbers, URIs, or regular expressions (RegEx) to identify calls by the destination number.
You will need two URI Groups for the integration--one for your contact center and another for the Mindful environment. You may already have a URI Group in place for the contact center, in which case you would only need to build the URI Group for Mindful. Click both of the following tabs for information on the required URI Groups.
URI Group for Mindful
Use the following steps to configure the URI Group for Mindful.
Quick access: SBC > Configuration Profiles > URI Groups
- Click Add above the list of existing URI groups and give the new group a name (such as mindful-callback).

- Click Next to proceed. You will be prompted to enter at least one URI.
- Configure the URI group to use the range of nine-digit SIP numbers assigned to your organization.
BEST PRACTICE
The simplest way to define the range of numbers in the URI Group entry is via regular expression (RegEx).
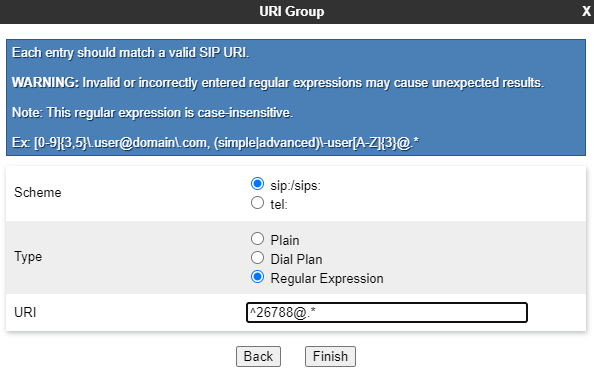
For example, if the nine-digit SIP number range assigned to your Mindful organization starts with 26788, then the regular expression format would be ^26788[0-9][4]@.*
- ^26788 denotes any number (^) starting with 26788.
- [0-9][4] denotes any four digits in the range 0-9.
- @ matches itself (look for the @ symbol after the four digits).
- .* indicates that anything can follow the @ symbol

URI Group for the contact center (if needed)
A URI group should already exist in SBCE for your contact center. If not, you will need to create one. In this URI group, make sure there is an entry that sends calls to the relevant queueing DNs in the contact center. For example, if your contact center is based on an Avaya Aura platform using Communication Manager, using five-digit numbers starting with 5 for the VDN number range, then you might add an entry using regex that looks like this:

This will be used on the return calls from Mindful Callback in either of two scenarios:
- The customer chooses to hold rather than requesting a callback.
- Mindful is dialing the callback and needs to get an agent on the line.
At least three URI groups will be used in the Mindful call flow:
- One to match calls to the contact center
- One to match calls to the PSTN (carrier/SIP provider)
- One to match calls to Mindful Callback, as in the example below:
 URI Group matching calls to Mindful Callback
Create Routing Profiles
Routing Profiles determine where to send calls by matching the called number with a URI Group. A typical configuration will contain at least two routing profiles–one for calls arriving from the contact center heading outward and one for calls arriving from the PSTN heading inward.
Click the following tabs for information on both Routing Profiles.
Calls arriving to SBCE from Mindful
The first Routing Profile will route calls arriving from Mindful Callback. This will includes calls from Mindful to the contact or to your customers. Use the following steps to configure this profile.
Quick access: SBC > Configuration Profiles > Routing
- Click Add above the list of existing profiles, then enter a name for the profile (such as From_Mindful):

- Click Next to configure the profile.
First Routing Profile entry
You will need to add one entry to start, but at least two entries will eventually be added to this profile--one to the contact center (for calls from Mindful to agents) and one to the PSTN (for calls from Mindful to the customer via SBCE). We will start with the entry for calls coming from Mindful into SBCE destined for an agent queue.
- Configure the contact-center entry first, as shown below:

- Select the URI group that matches your contact center (Avaya Session Manager, etc.), and click Add to add a next-hop address.
- Configure the next-hop address as follows:
- Priority/Weight: Specify a priority here (1 in our example).
- SIP Server Profile: Select the SIP Server Profile that matches your contact center
- Next Hop Address: Select from the list of Next Hop Addresses associated with the selected SIP Server Profile.
- If your contact center contains more than one SIP destination, add each one as another next-hop address.
- Click Finish to add this entry to the new Routing Profile.
Second Routing Profile entry
The second entry will capture calls from Mindful that are intended to be sent to your customer.
- Click Add above the list of entries within the profile to configure a second entry, then configure the new entry as shown below:
- URI Group: You can set this to either the URI group for the PSTN/SIP provider or leave it as * since this route will have a lower priority than the contact-center entry.
- Click Add to add a new next-hop address with the following configuration:
- SIP Server Profile: Select the SIP Server for your carrier or SIP provider
- Next Hop Address: Select the appropriate next-hop address from the list available for the selected SIP Server Profile.
- If your configuration contains more than one PSTN SIP destination, add each one as another next-hop address.
- Click Finish to add this entry to the new SIP Profile.
The Routing Profile should now look like the example below:

NOTE
Note the priorities in this profile. These are not the same as the priorities for the next-hop addresses within each entry.
This example shows that it will try to match calls coming from Mindful first against numbers in the Contact Center URI group (the queueing DN numbers), and if the called number does not match that entry, it will then try the next entry in the list. Since this one has a URI group value of *, all calls that arrive here will be sent out to the SIP provider to reach the customer.
Add a route to Mindful for calls from the contact center
In addition to creating the new Routing Profile, you will need to modify the existing Routing profile that matches calls coming from the contact center to include a route outward to Mindful Callback. See the example below:

In this example, calls coming from the contact center will be matched against an Emergency group first. If the called number is not an emergency number, it will then be checked against a new entry in this profile using the mindul-callback URI Group and SIP Server Profile. If the called number matches the regular expression in the mindful-callback entry, the call will be sent to Mindful Callback using the address configured in the Mindful Callback SIP Server profile.
If the called number is neither an emergency number nor a number matching the Mindful Callback URI group, the call will be sent to the default route to your SIP provider.
Create a Topology Hiding Profile
A Topology Hiding Profile ensures that IP addresses and domain names are only viewable within their own zones. For example, when the contact center sends a SIP Invite to the SBC with a Mindful Callback SIP number, the SBC ensures that all contact-center IP addresses and domain names are replaced with the SBC’s public IP when it sends an INVITE to Mindful Callback.
For the Mindful Callback integration, a profile with everything set to Auto should work, as seen below.
Quick access: SBC > Configuration Profiles > Topology Hiding

Create Server Flows
Server Flows connect the previous configuration together to determine valid flows from Mindful to the contact center, etc.. Server Flows also apply security policies. Each Server Flow is used for calls coming to and from the SIP Server, and two Server Flows will be used for every call.
The following diagram illustrates how the Server Flows are used throughout the call flow:
.jpg?sv=2022-11-02&ss=b&srt=o&spr=https&st=2024-05-08T05%3A51%3A13Z&se=2024-05-08T06%3A01%3A13Z&sp=r&sig=6CkAFJ2InrftzhoKk6l%2FKW7gLZxdevDhAcuaZNeQcww%3D)
Existing Server Flows
A few Server Flows should already exist in your instance of SBCE. We typically see one for calls to and from the contact center (shown as SM8 in the example below), and one to the SIP provider or carrier.
 A common pair of Server Flows prior to Mindful integrationYou will need to create one new Server Flow for Mindful itself and another new flow for Mindful and the SIP provider (carrier) if it does not already exist. You should not need a new Policy Group for the standard SIP/RTP configuration. The default Policy Groups should be sufficient.
Review both tabs below for instructions on configuring both of the required Server Flows.
New Server Flow for Mindful
Use the steps below to configure the new Server Flow for Mindful:
Quick access: SBC > Network & Flows > End Point Flows > Server Flows tab
- On the Server Flows tab, click Add in the top-right of the current list of Server Flows.

- Configure the flow as seen in the example above:
- Name: Enter a descriptive name (such as Mindful Callback Flow).
- SIP Server Profile: Select the Mindful Callback SIP Server Profile created in a prior step.
- URI Group, Transport, and Remote Subnet: Leave these fields at the default values.
- Received Interface: Select the private interface of the SBCE (the interface used for communication between the SBC and the contact center).
- Signaling Interface and Media Interface: Select the public SIP and media interfaces used for communication between the SBCE and external SIP entities (such as the PSTN). Combined with the Received Interface, these three fields specify that this flow will be used for calls to Mindful Callback, coming from the private interface (contact center). For these calls, the public interface will be used to communicate with Mindful Callback.
- Routing Profile: Select the new Routing Profile for Mindful Callback created in a previous step. This instructs the SBC to use this Routing Profile when a call arrives from Mindful to determine where to route the call next.
- Topology Hiding Profile: If you created a new Topology Hiding Profile in a prior step, select it here. If no Topology Hiding Profile is selected, it can result in issues sending calls to and from Mindful Callback.
- Click Finish to save this new Server Flow.
New Server Flow for Mindful and the carrier
In order for Mindful Callback to dial customers using your SBCE and SIP provider or carrier, you will need a new Server Flow to allow calls from Mindful (on the public interface) to go back out the public interface to the PSTN.
Use the following steps to configure this Server Flow.
- On the line containing your current SIP provider/carrier flow, click Clone.

- Configure the flow as seen in the example above:
- Name: Enter a descriptive name (such as PSTN Flow 2).
- SIP Server Profile: Select the SIP Server Profile for the SIP provider or carrier.
- URI Group, Transport, and Remote Subnet: Leave these fields at the default values.
- Received Interface: Select the interface on which calls from Mindful are received (for example, the public interface).
- Signaling Interface and Media Interface: Leave these fields at the same values as the original cloned Server Flow. Combined with the Received Interface, these three fields allow calls from Mindful coming in on the public interface to go back out the public interface to the SIP provider or carrier.
- Routing Profile: Set this to the default value or leave it as is. The Routing Profile will not be used in this Server Flow.
- Click Finish to save the Server Flow.
Final list of Server Flows
In our example configuration, we now have the following Server Flows:

The SBCE configuration for Mindful Callback using standard SIP and RTP is now complete and should be ready for testing.
Additional requirements for TLS/SRTP
To secure the SIP and RTP traffic between SBCE and Mindful, additional configuration is required in SBCE. This section details the extra steps needed to secure the traffic after completing the basic setup detailed in the prior section.
Overview
The following items must be configured to secure traffic over TLS/SRTP:
- Mindful Callback TLS certificates
- Client Profile
- Modified SIP Server Profile for Mindful
- Media Rule Set
- End Point Policy Group
- Modified Server Flow for Mindful
- Updated Interworking Profile
Consult the remainder of this section for detailed instructions for each of these items.
TLS certificates for Mindful
To communicate with Mindful Callback over TLS, you will need to import the CA root and intermediate certificates from Entrust, which can be downloaded at https://www.entrust.com/resources/certificate-solutions/tools/root-certificate-downloads. In the Entrust Root Certification Authority (G2) column, download the Root certificate and the (Non‐EV SSL) CA - L1K certificate.
Use the following steps to import the Mindful Callback TLS certificate.
Quick access: SBC > TLS Management > Certificates
- On the SBCE Certificates page, click Install near the top right above the list of existing certificates.

- Configure the certificate as seen in the example above:
- Type: Select CA Certificate.
- Name: Provide a descriptive name (such as MindfulCallback).
- Allow Weak Certificate/Key: Select the checkbox. If this is deselected, the certificate will be rejected during installation due to it’s self-signed status and supported ciphers.
- Certificate File: Select the .crt chain file containing the Entrust certificate, then click Upload. Contact a Mindful representative for assistance in obtaining the correct certificate from Entrust, if needed.
In this example, you can also see the TLS Server certificate belonging to the SBC (under Installed Certificates) and the CA certificate issued by Avaya System Manager. |   |

Client Profile
The Client Profile is used by a SIP Server Profile to determine which TLS certificates and parameters to use when establishing a TLS connection with the associated SIP Server. You will need to create a new Client Profile for the Mindful Callback SIP Server, so that SBCE can use the Mindful TLS certificate.
Use the steps in this section to configure the Client Profile for the Mindful SIP Server.
Quick access: SBC > TLS Management > Client Profiles
- Select the existing Client Profile used by the Mindful Callback SIP Server.

- Select the new Entrust certificate and keep any already selected.
- Click Next to proceed, then configure the second page as shown below:

- Click Finish to save the Client Profile.
Modified SIP Server Profile for Mindful
The SIP Server Profile created in the previous section (Basic requirements) must be modified to use the new TLS Client Profile. Follow the steps below to make the necessary modifications.
Quick access: SBC > Services > SIP Servers
 |
|
Media Rule Set
The Media Rules policy defines the voice and video media rules concerning security, codecs, and Quality of Service (QoS). When using TLS as the SIP transport protocol, it makes sense to ensure that the media is also encrypted. To do this, you will need to create a new set of Media Rules for SRTP media communication with Mindful Callback.
Use the steps below to create a new Media Rule Set.
Quick access: SBC > Domain Policies > Media Rules
- Click Add above the list of existing Media Rules, then give the new rule set a name (such as mindful-srtp):

- Click Next and configure the first page of the new Media Rule as shown:

- Click Next to proceed to the QoS configuration, but only if Quality of Service is enabled by your network infrastructure and internet provider. If QoS is enabled in your environment, configure the Media QoS Marking section as shown below:

- Click Finish to save the new Media Rule set.
End Point Policy Group
The End Point Policy Group connects Rule Sets together into a single group. For the Mindful Configuration, only one Rule Set was created (Media Rule), but you will need a new Policy Group to use the new Rule Set without impacting existing Policy Groups.
To create a new Policy Group:
Quick access: SBC > Domain Policies > End Point Policy Groups
- Click Add above the list of existing policy groups, then give the new group a name (such as mindful-policy-grp):

- Click Next and configure the policy as shown below. All fields can be left with default values except the Media Rule field. In the Media Rule field, select the newly created Mindful SRTP Media Rule:

- Click Finish to save the new End Point Policy Group.
Modified Server Flow for Mindful
Quick access: SBC > Network & Flows > End Point Flows > Server Flows tab
The Server Flow for Mindful Callback must be modified to use the newly created End Point Policy Group.
To do this from the list of Server Flows, click Edit on the line containing the Flow used for calls to and from Mindful Callback. Change the End Point Policy Group to use the newly created Policy Group, and then click Finish to save the updated Server Flow.

Updated Interworking Profile
Avaya added a new Interworking Profile parameter in SBCE version 8.1 that should be set when using SIP over TLS. The new option is named SIPS Required. When selected, SIPS Required instructs SBCE to set the relevant SIP URIs to use SIPS: instead of SIP: if SIP requests using this profile are sent over TLS.
This option does not exist in older versions of SBCE. However, Mindful Callback has been configured to accept SIP requests over TLS without the SIPS prefix, so there should be no issues with older SBCE releases. We have tested this successfully with an 8.0 version without this setting.
To ensure this is set for the Interworking Profile used by by the Mindful Callback SIP Profile:
Quick access: SBC > Configuration Profiles > Server Interworking
- Select the Mindful Callback Interworking profile created earlier from the list of Interworking profiles
- At the bottom of the General page for this profile, click Edit.
- Update the Interworking Profile as shown:

Was this article helpful?